Part 5: Finetuning
TL;DR
Fine-tuning is the most time-consuming part, but is also the most crucial. The general sequence of steps is as follows:
- Refine the GAP. Use the 9 and 0 keys to adjust the GAP by 10ms at a time until the first line sounds perfect. Time and check a line in the middle to verify.
- This is the most important step, as an incorrect GAP will have cascading effects throughout the rest of the song.
- Start timing notes: You can use the Ctrl + G shortcut to automatically move all notes to the nearest strong gray line, if they aren't already there.
- You can use the waveform feature to get a visual aid on where notes should go. Generally speaking, peaks in the waveform indicate the beginning of a new note.
- For most very rhythmic songs, like this one, the strong gray lines will effectively perfectly time the song, because the vast majority of notes will start on one of them.
- Prioritize note timings -- the start of notes -- before moving onto note lengths. Use SHIFT and the arrow keys to move notes left and right.
- A note should start just after you audibly hear the aspiration from the start of the syllable.
- In most circumstances, no two notes should touch. Ideally, there is a gap of at least two units between each note, as that makes the chart more flexible to the various pieces of hardware that people have without making the game that much easier.
- Note lengths: A note should last until just before you hear the unpitched part of a syllable (for example, an "s" sound). If in doubt, you should bias towards ending the note earlier rather than later.
- Use ALT and the arrow keys to shorten or lengthen a note by one unit, without changing the starting position.
- If, at this point, you've noticed a pitch change in a note that you did not account for in Part 2: Lyrics, hit the - (minus) key to split the current note into two, then shorten the first note and move the second note (often a ~) to your desired location.
- When you've finished a line, hit Ctrl + A, then Space to ensure that all notes in the line are timed correctly.
- If a note is noticeably off, move it to the right if it is noticeably early, or to the left if it is noticeably late. Examples:
- You hear the timing click sound before the singer begins vocalizing the note: it is early; move to the right
- You hear the timing click sound after the singer begins vocalizing the note: it is late; move to the left
- Line breaks and note timing warnings: Acknowledge and resolve all of them, even if marked as 'unsafe'. If you have a note that is marked as unsafe and with correct timing, chances are the note is just too long and you should shorten it so that people can more easily react to the next line (as the error says).
- If a note is noticeably off, move it to the right if it is noticeably early, or to the left if it is noticeably late. Examples:
- Repeat until you get to the end of the song.
- If you notice a line that repeats (e.g. a chorus), feel free to copy paste the timing.
- Once all notes are correctly timed, you can start pitching.
- You can also pitch each line after you've finished timing it, which is what I personally do. This may be faster -- especially when copy pasting identical sections that have the same pitches -- but requires you to be able to pitch effectively and reliably. It may be better to wait until you have finished timing everything to start pitching, or to allow someone else to pitch your well-timed chart.
Overview
Arguably the most time-consuming part of song creation is finetuning. This is the process of taking the notes we tapped in Part 4 and adjusting them so that they're timed better, since human button presses are usually imperfect. For most normal songs, there will be around 300 to 400 different notes to time!
Fine-tuning is the most important aspect to determine a song's playability. If the notes are not timed correctly, players will have a bad time. Pitches can be fixed; bad charts may have to be remade entirely.
This finetuning process is normally accomplished with a song editor. A more verbose overview of the song editors that exist is available in Preface B, but we will be using Yass Reloaded in this tutorial for its convenience features.
If you'd like, you can download the pre-finetuned version of the chart and follow along, or manipulate it on your own. Don't forget the audio!
Configuring Yass
If you've never opened Yass before, you will probably need to configure it. If you would like to reset your configuration, you can delete it from the .yass folder in your home directory (e.g. C:\Users\lily\.yass or ~/.yass).
When you first open Yass, you will be asked to point to where your songs are located:
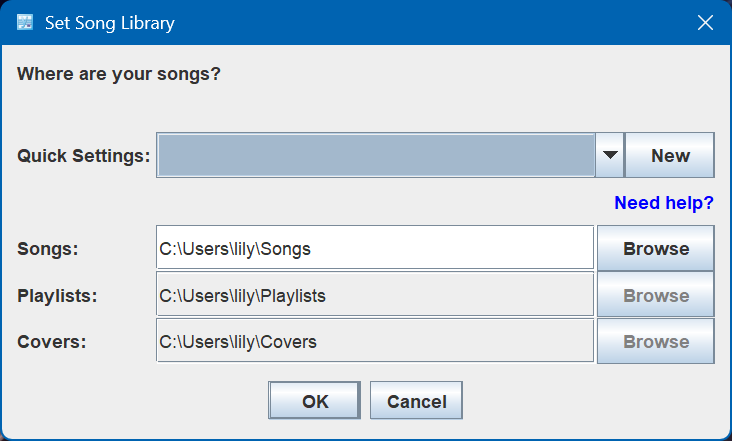
I obviously cannot tell you where you decided to place your songs, as it depends on where you installed the program. Click "New" and navigate to wherever your UltraStar Deluxe folder is. The rest of the fields should auto-populate, then you should be good to click "OK".
Then you should see this dialogue box:
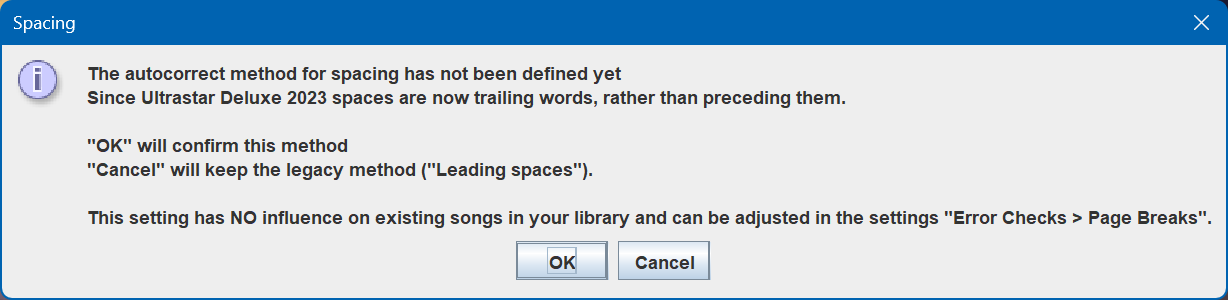
What you do here is up to you. Like I said earlier, I personally use Before Spaces as it makes it easier to troubleshoot whenever I need to manually modify the TXT, but some argue that you shouldn't do that anyway. Hitting "OK" will set it to After Spaces, while hitting "Cancel" will set it to Before Spaces.
The last dialogue box about refreshing is mainly informational, just click OK.
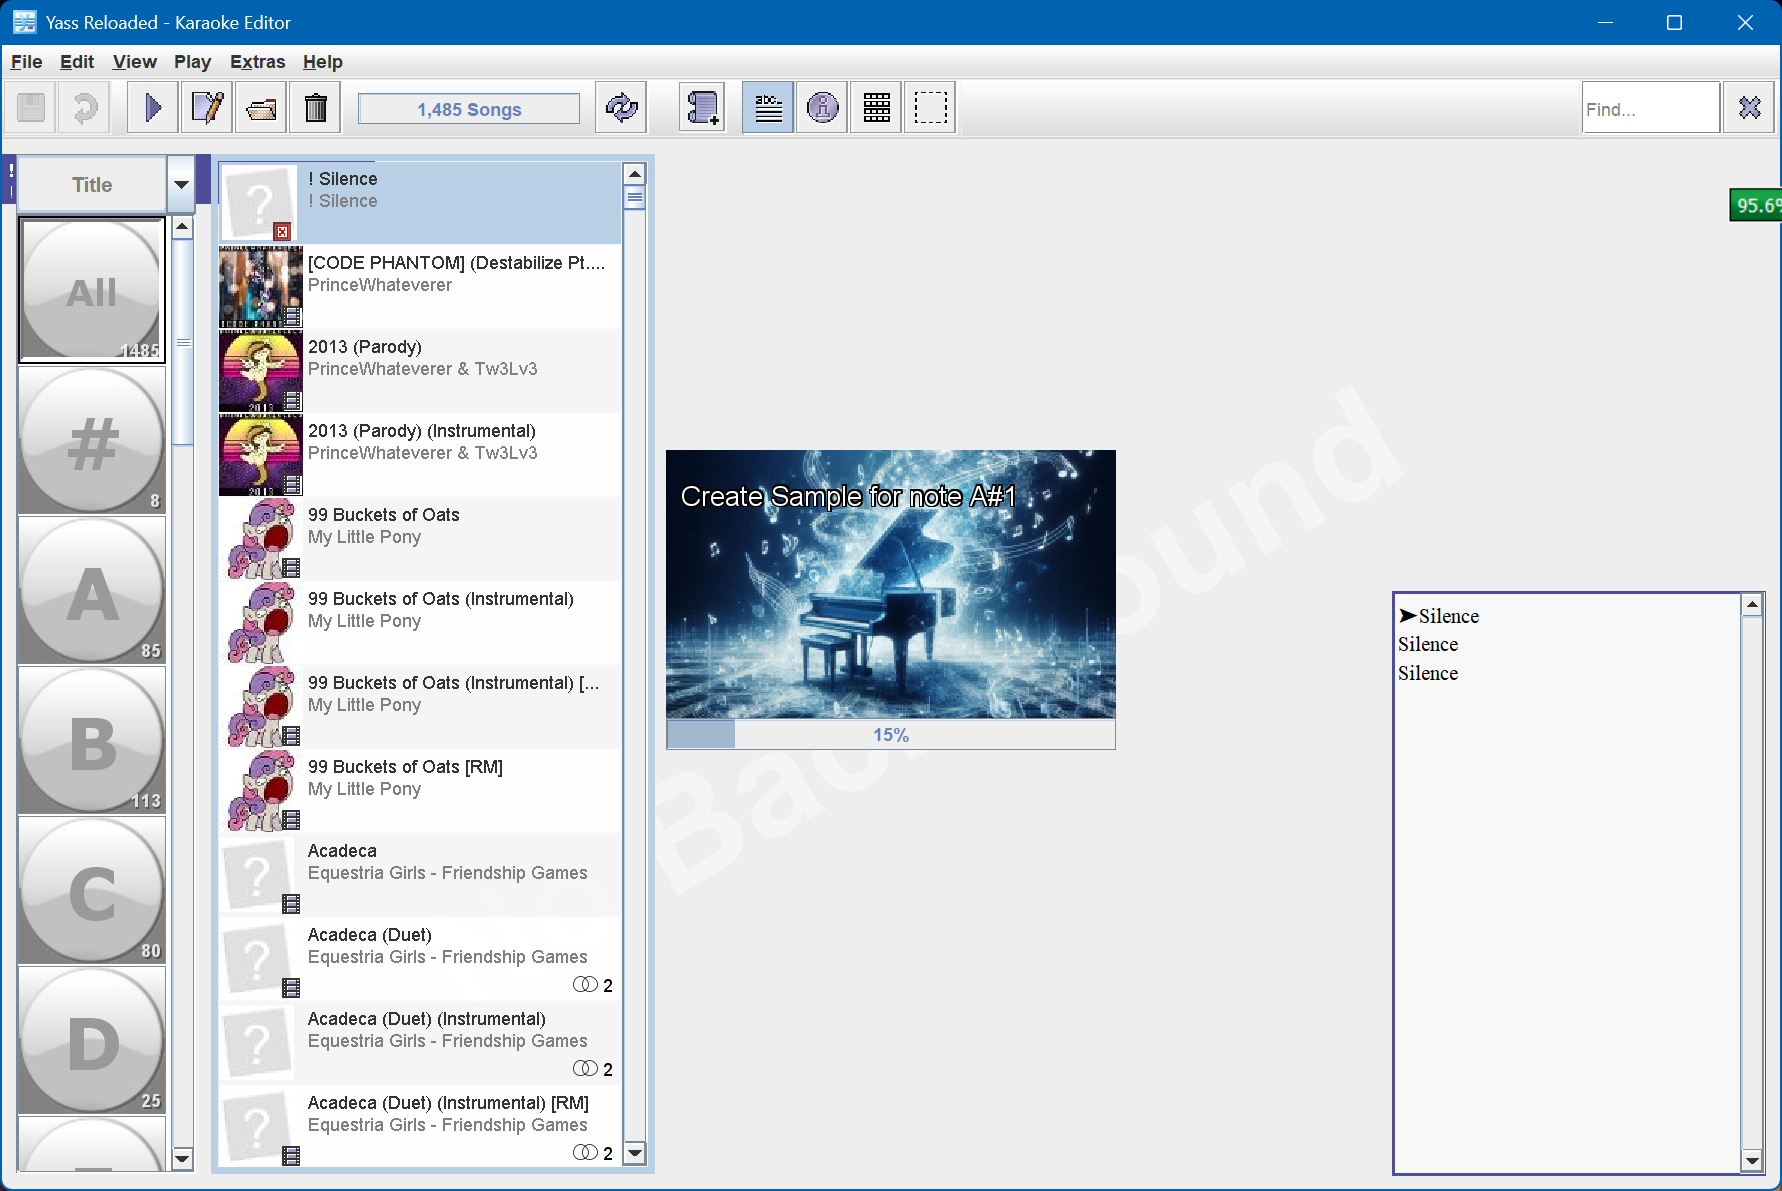
Finally, you will see Yass's main menu open. It will also probably spend a minute or two creating piano samples; let it do that.
Preferences
Before we continue, we should set some preferences. On the top bar, click Extras, then Preferences and you should see the preferences window appear. Here's what I would mainly configure:
- Library > Locations: Set the location of ffmpeg if you haven't already. Aubio is also theoretically useful for help pitching songs, but I've never used it.
- Error Checking > Tags > Compatibility: Up to you
- If you would like to use Aubio for pitch assistance, you will need to use SHINY (1.1.0) and to have a vocal (a cappella) track
- If you don't care about this, use UNITY (1.0.0)
- The main difference between 1.0.0 and 1.1.0 is that #MP3 is deprecated in 1.1.0, so if a track is made in 1.1.0 then #MP3 may automagically disappear, which will break compatibility with older games that do not recognise the new #AUDIO tag
- Error Checking > Page breaks > Spacing: Up to you
- This is where you can decide whether spaces should be before or after words
- I personally recommend "before"
- UltraStar-Creator will use "after" by default, so if set to before a bunch of errors will show up that can be automatically corrected
- Editor > Design: Check "Show beat" and "Show scale"
- You can enable dark mode if you want
- Advanced > Audio/Video > Piano > Volume: Maximum
- Advanced > Audio/Video > Editor > Accuracy: Check "Show waveform"
Then, to start editing your song, you can either select it from the list and hit Ctrl + E, or click File (top bar) -> Edit and navigate to the location of your TXT.
If you close Yass, then you can quickly get back to the last song you opened by using Ctrl + R. (or File -> Resume Editing).
Main Controls
Before we start adjusting things, let's get used to the main controls of Yass. Yass can generally be navigated by key combinations, and that is what you will probably primarily use. However, there is also usually a button on the GUI that can accomplish what you want.
Yass Editing Menu
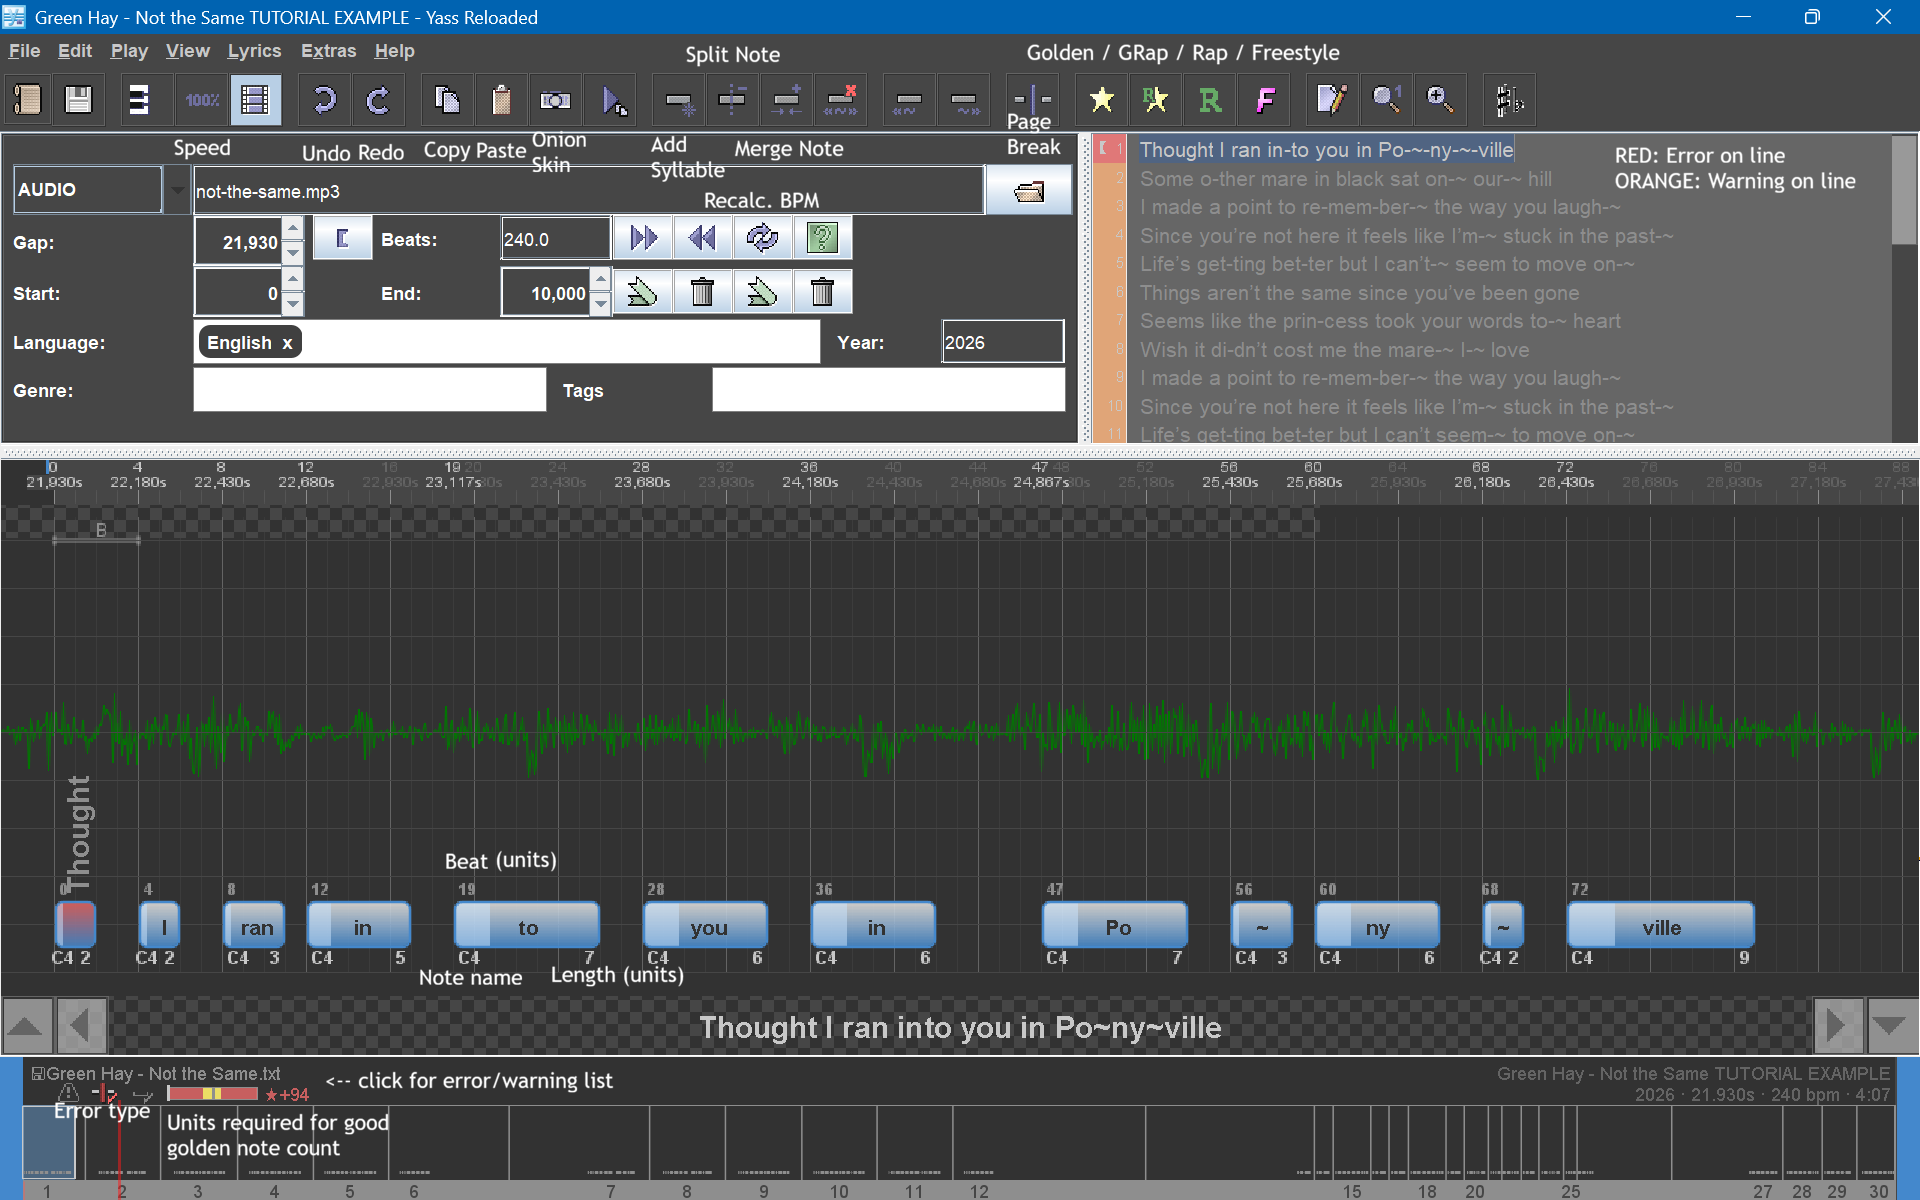
If you forget a specific key combination, click on the top menu buttons (Edit / Play / View / Lyrics). A list of possible actions will be displayed, with their key combinations next to them.
Moving note positions
There are three main ways to move notes. These actions do not affect pitch; they only affect the point at which the note plays.
SHIFT + arrow key LEFT/RIGHT: Move the note
This moves the note to the left or right, while keeping its length.

ALT + arrow key LEFT/RIGHT: Move note end position without changing start
This lengthens or shortens the note, while keeping its starting position.
CTRL + arrow key LEFT/RIGHT: Move note start position without changing end
This lengthens or shortens the note at the beginning, while keeping its ending position.
Pitching notes
You can pitch notes by using CTRL + arrow key UP/DOWN. Hold SHIFT as well (CTRL+SHIFT+arrow key UP/DOWN) to change pitch by a full octave.
CTRL + arrow key UP/DOWN: change note pitch
Selecting multiple notes
You can select multiple notes with SHIFT + arrow key UP/DOWN. When multiple notes are selected, you can make the same adjustments as you would with just one note selected, using the same key combinations:
SHIFT + arrow key UP/DOWN: Select multiple notes
Use Ctrl + A to select the whole line, or Ctrl + Shift + A to select the whole song.
Splitting notes
If you want a note to split into two (for example, to account for a new pitch), you can either click above it when a dotted line appears, or use the MINUS (-) key.
Splitting notes
Deleting notes
You can delete a note by pressing CTRL + DELETE.
Deleting notes
Note attributes
You can change the type of a note as follows:
- F: Freestyle [pink] (lyric is displayed, but note is not displayed. Players do not have to sing this note)
- G: Golden [gold] (note is worth double)
- SHIFT + F: Rap [green] (note is displayed, but players can make any sound to get points on it)
- SHIFT + G: Golden Rap [light green] (rap but worth double)
Changing note attributes with (Shift +) F/G
Adjusting GAP
The GAP (position of the first note) can be adjusted with the 9 (earlier) and 0 (later) keys. The first note should always start at beat zero.
If you move the first note to a position other than beat zero, it will appear as an error that you should correct. The gap will be updated accordingly.
Gap adjustment
Playing the current note
Something you will probably doing a bunch is playing the currently selected note(s). Use the SPACE button to do this.
You can also press P to play the current line in its entirety.
Playing the current note
Other useful shortcuts
- CTRL + Z: Undo the last action
- CTRL + Y: Redo the last action
- CTRL + C: Copy selection
- There are multiple paste options available. The one I use most often is CTRL + SHIFT + V, to paste the notes verbatim over what existed before (usually a chorus).
- CTRL + G: Align all notes to their nearest strong gray line
- CTRL + W: Toggle note click sound (this should almost always be on)
- CTRL + B: Toggle piano sound (for use during pitching)
Refining the GAP
The first step of finetuning is to refine the GAP. Chances are, when you tapped out the song, you did not tap the first note in precisely the right place, even if it sounds like you did. Since the GAP affects the entire rest of the song, you should be as sure as you possibly can that you have it correct.
Here's a video of me finding the GAP, with keypresses displayed on screen. You may note the following:
- I first played the line in its entirety, just to get an idea of how off the tapping was. (Is everything consistently off, or is it all over the place?)
- Then, I used the 9 key a bunch to move the GAP earlier (since in this case, everything was late).
- I then played the line again, and noticed everything was now slightly early (particularly in the "Po~ny~ville" part).
- So, I used the 0 key a couple time sto move the GAP slightly later.
- From there, the GAP was decent!
Refining GAP example video
We can verify the GAP we selected by going to somewhere in the middle of the sign, finetuning that (as necessary), and then seeing if everything is still on time.
Verifying GAP example video
Since the clicks still sound on-beat when they're aligned, it seems like our BPM (120) and our GAP (21830) are correct!
Fine-tuning note lengths
Once we have the correct GAP, we can start focussing on individual lines. Since we were already messing a bit with the first, let's continue messing with that:
Fine-tuning the first line
In this instance, the note timings were already adjusted earlier, so it was mainly about the note lengths. Here are the principles I usually go by:
- Each note should be separated by at least two units. It doesn't make the song much easier (since people have to hit those pitches at roughly that time anyway), and it helps account for differences between computer hardware, which could affect GAP. You can also think about it this way: When you sing, you wouldn't be singing like a synthesizer where you switch from one pitch to another immediately. In most cases, you will have some gap between each note.
- Is a gap of two units too much? In this case, a gap of one unit might suffice, since the BPM is low enough. However, I generally stick to a gap of at least two because...
- If undecided, it is better to have a shorter note length than a longer one. If a note is too short, players are unlikely to notice it unless it is egrigeously short (think about a note being held for, say, 10 seconds straight, and that note is let go at the sixth second. Players WILL notice that and wonder why it's so short). On the contrary, if a note is too long, then players will be frustrated by the level of precision necessary.
Refining note positions
What to finetune first: note positions and note lengths?
These days, I usually finetune note positions AND note lengths at the same time so that all that is necessary later on is pitching (actually, I usually pitch at the same time too, but that is besides the point). If you want to do things in a set order though, I would finetune note positions first.
This is because note positions are the most important part of the chart. If the timing is off, people will notice and not be happy. If a note is a bit too long, or a pitch is wrong, people can more easily correct that if it bugs them, and even then they might not notice (unless all the notes are stuck together).
With practice, you may be able to do all three at the same time without thinking about it (that is, position notes and their lengths as you work through it, then pitch them). But in the meantime, if you want to divide up the work to make it easier: first note positions, then note lengths, then pitches.
Our next lines might not necessarily be as well timed as the first one, so let's run through them to see what we might need to do:
Refining note positions for lines 2-6
Here are the things I would point out about this part:
- Most of the notes were already in the right place. This is part of why good tapping is so important: it saves a LOT of time!
- Any lines that had problems -- most notably the "Life's getting better" line -- was pretty easily fixed with Ctrl+G. I didn't even have to move any of the notes left or right.
- After making corrections, I played the whole line once (with Ctrl+A and then Space, but pressing P would also work) to ensure that all the clicks were in time with the music.
- If they were, then I continued to the next line.
This obviously won't be the case with all notes in all charts. This example song is 'easy' because the rhythms are very clearly defined, its notes go in relatively obvious places, there aren't any stupidly long notes, and most importantly, all of the notes (thus far) align with the strong gray line. When timing something more difficult, you will have to do things a bit more manually.
Positioning notes manually
For this example, I will be using an excerpt from a slightly more complex song. In this case, I'm using the first three lines of 4everfreebrony's Little Librarian (a parody of Don McLean's American Pie).
See the video for more details:
Finetuning without assistance from a rhythmic song
Main video takeaways
- Playing the whole line can help you zero in on notes that immediately sound very early or late.
- Move notes until you hear the aspirated start of the syllable (e.g. the "t" in "time"), then once you do, move it one to the right.
- End notes when the pitch becomes hard to hear, or when the syllable becomes unpitched (e.g. the hissing sound in a word that ends with "s").
- Unclear pitches should be marked as rap, either to analyze later or to indicate to the singer that the pitch does not matter for that note.
- Use the peaks of waveforms as an indicator of where the next note may be.
- Play through the whole line as a means of verifying the timing of each line.
Detailed video notes/commentary
- As you can see from the top bar, the BPM is set to 400. If I were to do the whole song, I would probably keep it this way because the BPM changes frequently.
- The majority of the song has a BPM of 145, which would give me alternate options of 290 (probably not enough granularity), or 435 (multiplying by three, which is annoying). So I might as well just set it to 400 (especially since I'm only doing a beginning excerpt).
- At the beginning, I'm trying to make sure that the GAP is correct. In this case, I actually tapped it pretty well, so the GAP only needed a minor adjustment (from 43 to 50), and even that might not have been necessary or noticeable.
- At around 0:16, I'm playing the whole line to see how it is as a whole. I can tell immediately that "time" was tapped very late, so that's one of the first things I target.
- I move it to the left until I'm hearing the main core of the "ime" sound (since "t" by itself is not really pitched). At 0:20, I move it one to the left, from beat 52 to beat 51. At this point, the "t" is audible, so it's too early, so I move it back to beat 52 and keep it there until the end.
- At 0:26, I'm shortening the "go" in "ago" because the sound has long trailed off. Same with the second 'long'.
- At around 1:00, I'm trying to figure out the time of the word "The" and realise that it's not really pitched. So, I pre-emptively mark it as rap.
- This song is by no means a rap song, but I use a rap note to indicate an unclear pitch, either because it needs further verification or because a singer really should treat it as "sing whatever".
- At 1:10, I'm pitching the "sis" in "sisters". Note that I cut it off as soon as you start hearing the hissing "s" sound at the end of "sis". A hiss isn't really pitched, so it shouldn't be considered to be part of the note, even though it is technically still part of the syllable "sis". The same thing happens with the s in "ters".
- Throughout the song, I'm using the peaks of waveforms to guesstimate where a new note starts. This is particularly easy for this excerpt, since the instrumental is not very loud.
- Finally, at 2:25, I run through all three lines at a time to make sure all notes sound like they start at the right place. While it may not be perfect, it is decent enough that people shouldn't have a problem if they were to play through it (and if it were pitched, of course).
Deciding on note types
As covered earlier, there are five main normal types: normal, freestyle, rap, golden, and golden-rap.
For now, we will ignore golden notes, as you should only start working on them after you have finished finetuning AND pitching. This means you only really have to focus on the difference between normal, freestyle, and rap. You can do this during finetuning or pitching -- it doesn't particularly matter -- but you should still be aware of them early on.
Normal notes
This is most notes. If the note has a discernable pitch, it should be a normal note. These points are scored based on whether the player is singing that pitch at the time that the note is playing, and for the entire length of the note (so if a player starts singing the pitch and then stops halfway, they won't get any points for the part where they did not sing).
Notes will be normal notes by default, and will only end up as any other type (rap, freestyle, golden) if you declare it as such.
Rap notes
As the name suggests, rap notes are traditionally used for rap. Since rap is generally better described as a form of 'syncopated speaking', the pitch of rap is difficult or even impossible to discern. As such, scoring is based purely on whether the player is making a sound -- literally any sound, it doesn't even have to be words -- at the time that the note is playing. The same thing about length applies: if the rap note lasts for a long time (for example, it's being used to indicate someone SCREAMING in the middle of the song) and the player stops making any noise, then they won't get any points for the parts where they did not make any noise.
However, I'd like to highlight another use of rap notes that is not as common in karaoke charts, but that I think should be popularized: using rap to indicate unclear pitches. In many songs, singers don't sing every pitch with absolute clarity. If you hear a sort of gravelly sound or vocal fry, it can't really be pitched, but it isn't like that shouldn't be sung, either. It's still a sound. So, I recommend setting those portions as rap notes. You will see me doing some of that in the examples, particularly in the pitching section of this guide.
I also sometimes use rap notes in cases where a player might expect to sing a certain pitch melodically, but the singer ends up singing a different pitch. Singers aren't always perfect, but players shouldn't necessarily be penalized because the singer didn't quite hit the note.
So: Use rap notes for actual rap, or for dialogue that you want a player to say out loud, or for words that should be sung but do not have a well-defined pitch. Treat rap as a 'you can sing whatever pitch you'd like, I don't care, just please make a sound here' type of note.
Freestyle notes
Freestyle notes are not scored. Players will not get any score for them. They can say them if they want, but the game will not read it or give bonus points or anything like that.
I recommend using freestyle notes if the pitch is inaudible (e.g. a word is implied by the lyrics, but said so quietly that no one could possibly discern it), or for dialogue that you want to show but that you do not want the player to speak out loud.
Line breaks
Yass and 'unsafe corrections'
Some line break-related errors may be accompanied by a warning stating "This correction is not safe". This warning is because, if accepted, the note at the end of the offending line will be shortened. Usually, you want to leave at least 50ms of space on each side of a line break, which normally corresponds to about two UltraStar units on each side. Assuming that the timing is correct, I recommend always accepting these corrections because it makes for a more enjoyable play experience, even if it's technically less "accurate".
In some of the examples, you may have noticed a bunch of orange warnings. These are because of so-called 'uncommon line breaks'. Yass uses an algorithm to determine where line breaks should go.
Honestly, I don't really care about them and just press Ctrl+T every once in a while when I'm charting things. You shouldn't really need to pay much attention to them either, other than the unsafe corrections thing. Just let Yass handle it and you won't even have to think about them.
Takeaways / Next steps
I know this was a lot of information, so I will end this section with a video of the rest of the finetuning done for the main example song.
Full finetuning video
The main point that I think you should take away from this is: finetuning is hard. There will often be scenarios where you think one of two positions could work fine, and you don't know which one to pick. That's perfectly okay. You will get better at it over time if you internalize these rules and learn the keyboard combinations of your song editor, whether that be Yass or something else.
At the same time, finetuning can be made easier if you give yourself less work to do. On a rhythmic song like this, nailing the initial tapping was key to making the finetuning a lot more trivial. Most of the changes just ended up being spamming Ctrl+G and refining note lengths, all because the work was put in earlier to ensure the BPM is correct (for note alignment) and to split the lyrics in advance (so that they don't need to be split during finetuning).
This song was a particularly easy example of finetuning. On something with variable BPMs, like in our Positioning notes manually example, it is necessary to think about where each and every note goes. That is where finetuning gets a bit harder, and possibly mind-numbing. Hence why you should start with the more rhythmically consistent songs first.
Once your song is finetuned, you're ready to start pitching!
<< Back to Part 4: Tapping >> Continue to Part 6: Pitching
Quick navigation: Index / Preface A / Preface B / Part 1: Audio / Part 2: Lyrics / Part 3: BPM / Part 4: Tapping / Part 5: Finetuning / Part 6: Pitching / Part 7: Golden Notes / Part 8: Testing / Part 9: Submission